


- The mitigation block is a kind of order block that fails to lead to continue the current trend, but instead yields a market structure shift that leads to a reversal.
- It’s different from a breaker block in that breaker blocks first lead to continuation in the current trend before yielding to a market structure shift in the opposite reaction.
- These levels serve as potential supply and demand zones for future trade opportunities.
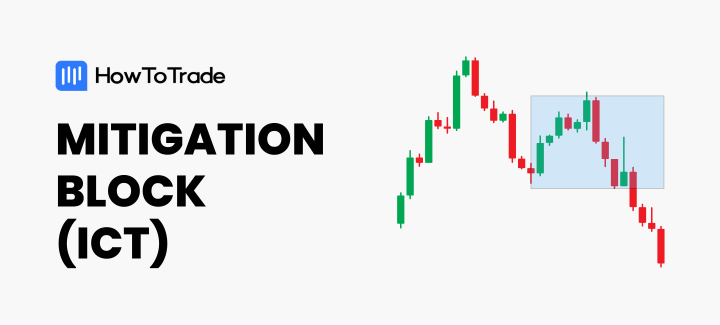
A common concept among Inner Circle Traders (ICT) is the Mitigation Block. It’s a kind of order block that helps to predict future price movements.
In this piece, you’ll learn:
- What the ICT mitigation block is, its types, and why it’s important to traders,
- How to identify the mitigation block,
- How to trade the mitigation block,
- Difference between breaker and mitigation blocks,
- And tips on how to draw and trade high-probability mitigation blocks.
- What is a Mitigation Block in Trading?
- What are the Types of Mitigation Block?
- What Makes the Mitigation Block Important in Trading?
- How Do You Identify a Mitigation Block?
- How Do You Draw the Mitigation Block on Your Chart?
- How Do You Trade Mitigation Block?
- Mitigation Block Vs. Breaker Block
- What are the Limitations of the Mitigation Block?
- Tips on Marking out High Probability ICT Mitigation Blocks?
What is an ICT Mitigation Block in Trading?
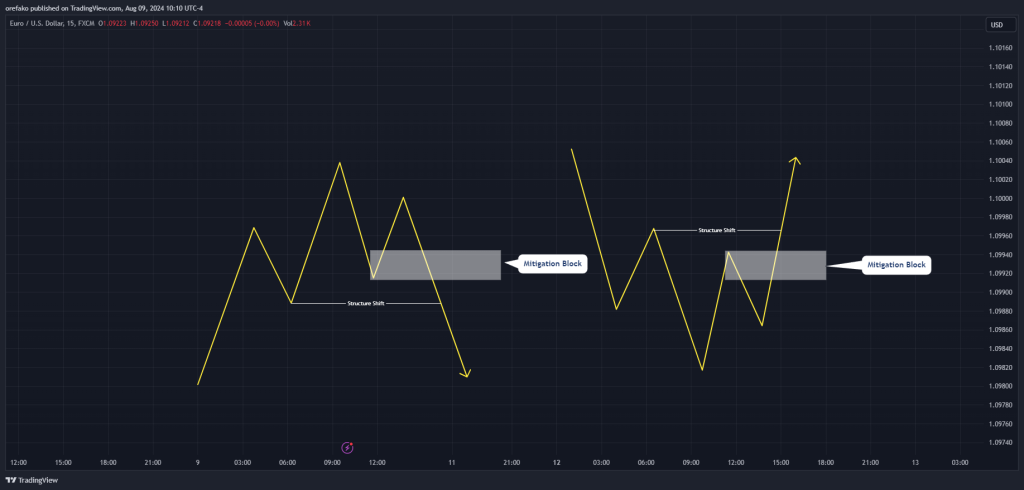
Usually, an order block is expected to lead to a reversal. A stronger order block may even lead to a break in structure. But what happens when this order block reverses the price, fails to lead to a break in structure, and instead gets mitigated? It becomes a mitigation block.
A mitigation block is an order block that temporarily reverses the price but fails to continue the current trend by creating a new higher high or low. Instead, the price reverses and pushes past the block to create a market structure shift. It’s an order block that failed before it could continue the current trend.
This concept is common among ICT traders.
Did you know there over more than 10 ICT concepts that traders use to determine potential future movements? check them out:
What are the Types of ICT Mitigation Block?
There are two types of mitigation blocks, depending on the current trend of the market:
- Bullish mitigation block, and
- Bearish mitigation block.
Let’s see what each is:
The Bullish Mitigation Block
The bullish mitigation block occurs at the end of a bearish trend. It happens when a bearish order block fails to create a lower low before reversing to shift the structure to the bullish side. It can serve as a strong demand level in the future, from which the price can rally further.
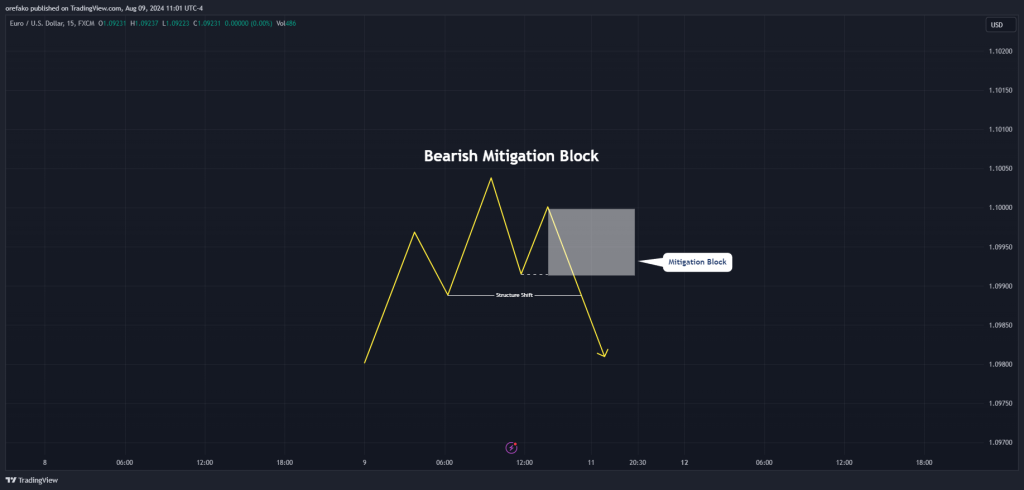
The Bearish Mitigation Block
This mitigation block occurs at the end of a bullish trend. Before the market structure shift, we have a bullish order block that fails to push the price past the most recent higher high. Instead, the price reverses and clears the order block to shift the market structure and begin a bearish trend.
What Makes the Mitigation Block Important in Trading?
Mitigation blocks are crucial for traders because they offer valuable insights into potential market reversals. Here’s why:
1. Identifying Potential Reversal Zones
They pinpoint areas where the market has previously shown signs of weakness or strength, suggesting a potential change in direction. For instance, when a bearish mitigation block forms, it is expected to become a supply zone from which the price can continue downwards. The same can be said for the bullish mitigation block, which will become a demand zone from which you may expect a further rally to the upside.
2. Improving Entry and Exit Points
Mitigation blocks serve as great entry and exit points for your trade. This is one of the more popular uses of these blocks.
After the block forms, it is common to find traders placing limit orders at those blocks. Also, traders who are already in a position see the mitigation blocks on the opposing side of their trades as potential exit levels.
3. Risk Management
Traders who enter trades at mitigation blocks tend to place their stop losses on the other side of the block. For instance, you can enter a bearish trade as soon as the price touches the bottom of the mitigation block and place your stop loss just above the same block.
4. Confirmation of Market Sentiment
Mitigation blocks can reinforce your view of market sentiment when combined with other technical indicators. This way, you get a clearer picture of what the market is trying to do.
How Do You Identify an ICT Mitigation Block?
Identifying the mitigation block is relatively easy. Let’s show you how:
1. Higher Timeframe Point of Interest (POI)
The first step in identifying a mitigation block is to identify a point of interest (POI) on a higher time frame. This POI could be an order block, Fair Value Gap (FVG), rejection block, or any important level where you may expect a reversal.
This higher timeframe POI adds confluence to your mitigation block. If, for instance, you expect the market to reverse to the bearish side after reaching a daily order block, you go to the 15-minute chart, and indeed, a market structure shift has happened after creating a mitigation block.
Without this higher timeframe POI, your mitigation blocks risk being false.
2. Wait for a Reversal
After the price reaches your higher timeframe level, go to a lower timeframe to scout signs of reversal. And this is where you’ll often find your mitigation block.
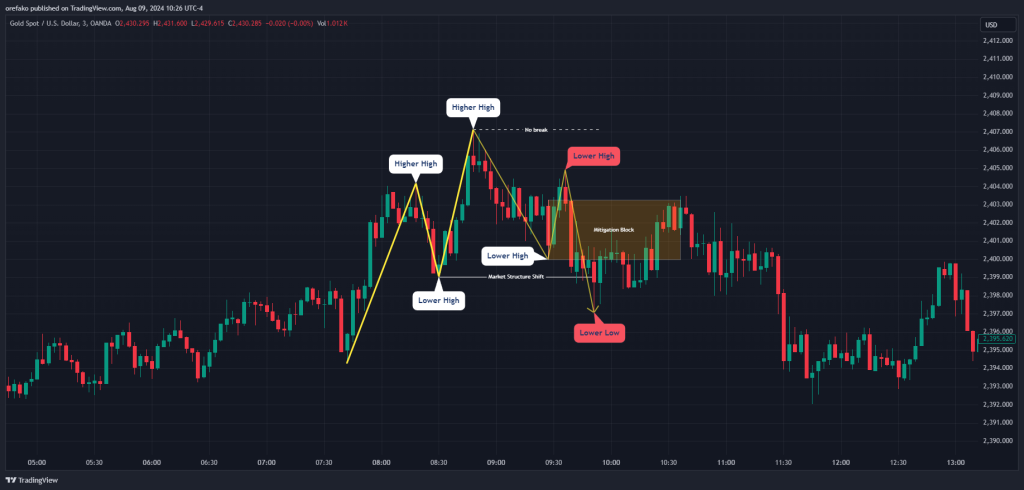
Note the order for a bearish mitigation block:
- You want to see a new higher low after your most recent high (your higher high).
- This higher low must fail to create a new higher high.
- The price will then fall to break this previous low, leaving a new lower high behind.
- The last significant down-close candle on the higher low is your mitigation block.
And for the bullish mitigation block, here’s the order:
- After the most recent low (the lower low), you want the price to rise and create a new lower high.
- This lower high must fail to create a new lower low.
- The price must then rise to break the lower high, leaving a higher low behind.
- The last significant up-close candle on the lower high is your mitigation block.
How Do You Draw the ICT Mitigation Block on Your Chart?
There are two main ways of drawing the mitigation block on your chart. How you choose to draw yours will depend on your trading style.
The first is to use the last significant down-close candle before the push that creates the lower high for a bearish mitigation block; or the last significant up-close candle before the creation of the higher low for a bullish mitigation block.
The second method of drawing your mitigation blocks is to mark the entire leg leading to the lower high in a bullish scenario or the entire leg leading to a higher low in a bearish scenario.
The first one is more precise than the other, giving you a better reward for your risk. On the flip side, it’s possible that the price does not get to the order block before reversing. The second method is not as precise and won’t give you the reward for the risk the first offers, but it will help you catch the most trades.
How Do You Trade Mitigation Block?
This section will show you how to use the mitigation block in your trading.
1. Locate a Higher Timeframe POI
Your first task is to locate a higher timeframe POI. The POI could be an order block, an FVG, an Optimal Trade Entry (OTE), or any other point where the price is likely to reverse. Also, your “higher timeframe” could be any timeframe higher than the one you intend to take your trade entry on. In our example, we’ll be using the 15-minute timeframe as our higher timeframe and the 2-minute chart as our entry timeframe.
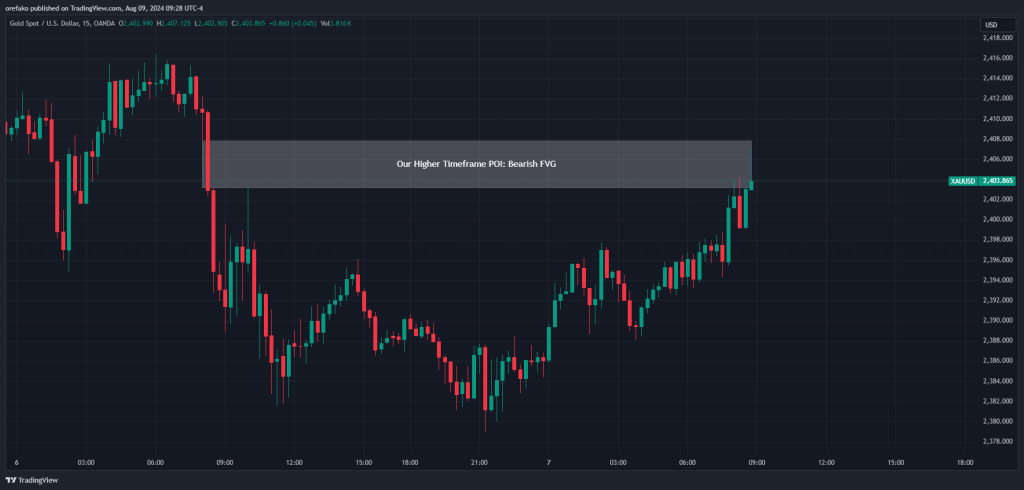
Here’s an XAUUSD chart where we’ve marked out our higher timeframe POI, a bearish FVG.
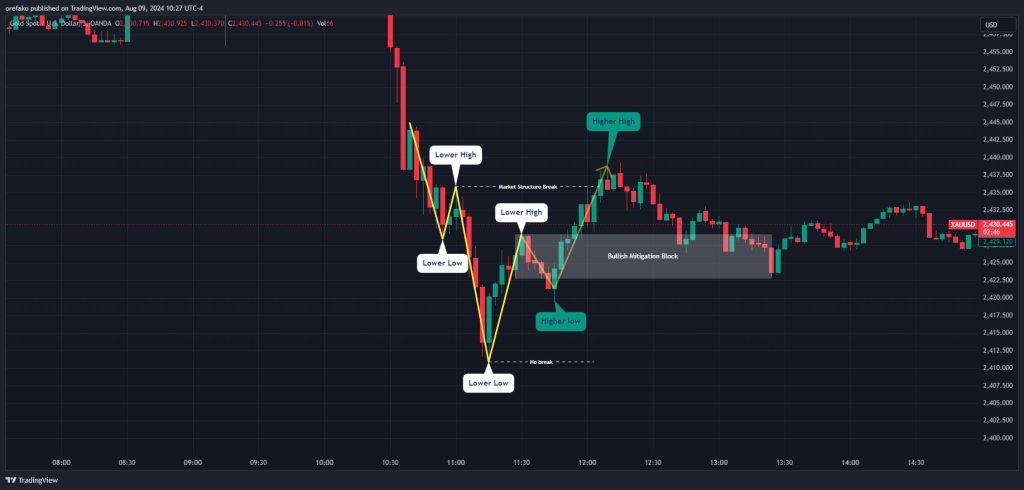
It helps that the POI is in the direction of the trend. The trend was already bearish in our scenario, and we marked out a bearish order block. In the smaller timeframe, the price will approach this level as an internal uptrend, and from there, we expect to see a reversal that will continue with the major bearish trend.
2. Identify your Mitigation Block
Dip into your lower timeframe and wait for the formation of the mitigation block. Don’t forget that it’s the block that fails to break structure in the direction of the current trend before a market structure shift.
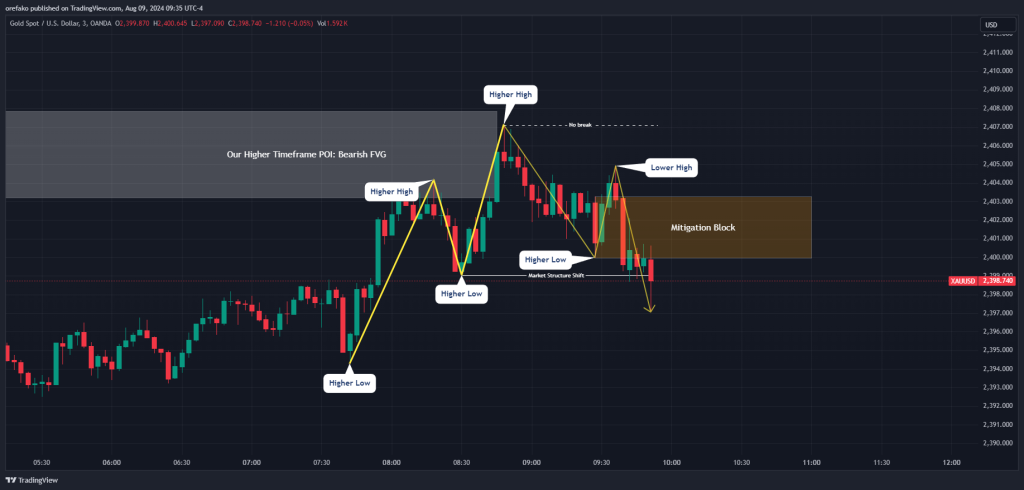
In our XAUUSD chart, for instance, notice that our higher low does not lead to a higher high. Instead, it creates a lower high before breaking that higher low. We then mark out the mitigation block using the last significant down-close candle before the failed rally up.
3. Place Your Entry at the Mitigation Block
There are various ways to go about your trade entry. The aggressive approach is to place limit orders as soon as the mitigation block forms.
If you’re scouting a bearish mitigation block, for instance, place your sell limit order at the bottom of your mitigation block. If you’re looking at a bullish mitigation block, place your buy limit order at the top of your mitigation block. The idea behind this is that the block tends to reverse the trend.
So, by placing our orders there, we can catch the reversal just as it happens. However, we run the risk of the block being cleared out as though it weren’t there.
The conservative approach is to wait for some candlestick formation that confirms that the market is truly about to reverse, even after we get to the mitigation block.
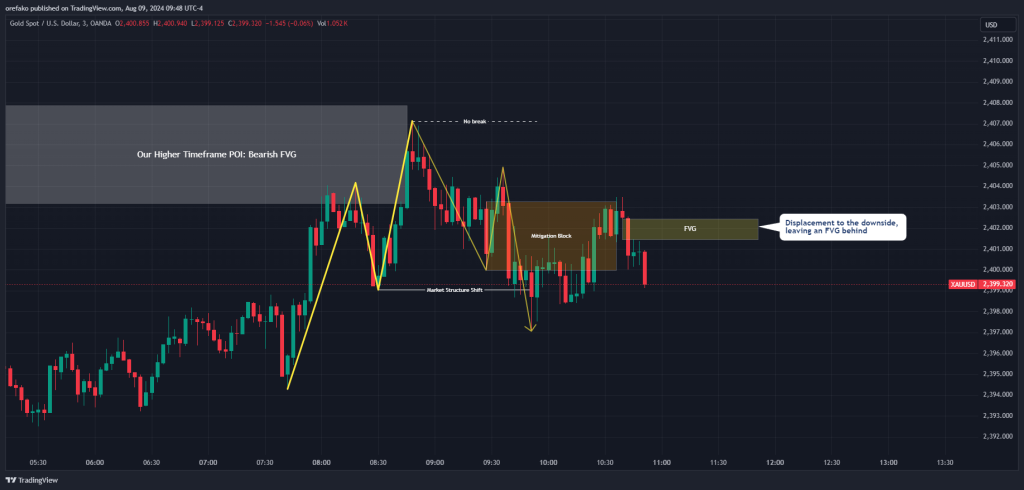
In our trade example, for instance, we wait for signs of a bearish move inside the mitigation block. We see a strong displacement to the downside, leaving an FVG behind. It is at that FVG that we place our limit order.
4. Manage your Risk
What’s next is to place your stop loss on the other side of your mitigation block. Some traders place it just on the other end of the mitigation block. This method is more aggressive. You’ll also find some traders placing it above the most recent swing high or low on the chart, which is more conservative.
And as for your profit target, you can be more flexible with this. You can place it at the next significant low or the next order block/FVG in the direction of your trade. If you’re very ambitious, you can also look for the next swing point on the higher timeframe and place your profit target there. This method guarantees the highest risk to reward in most cases. However, it is just as risky.
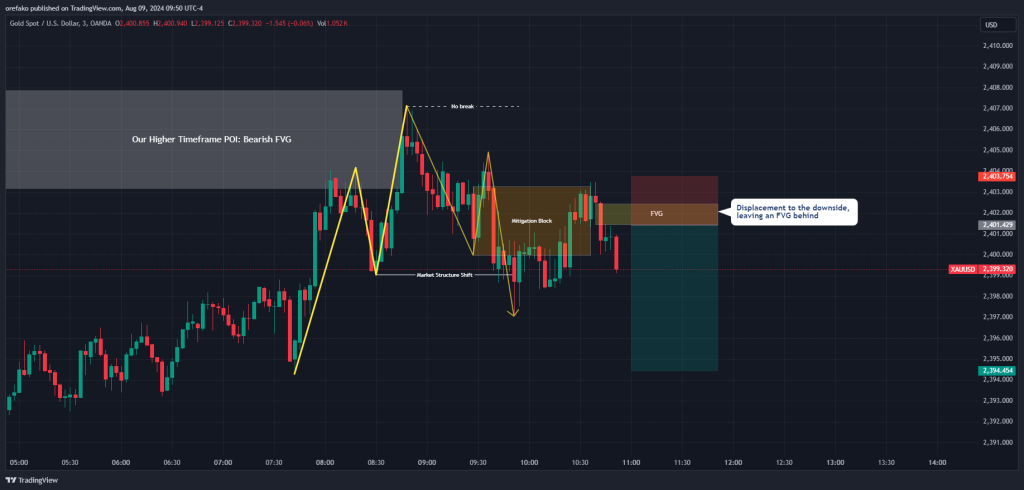
In our trade example above, we’ll place our stop loss just above the mitigation block and our profit target at the next significant low.
Let’s see how the trade goes:

Mitigation Block Vs. Breaker Block
Another concept similar to the mitigation block is the ICT breaker block. Both concepts often appear during reversals, only with slight differences.
First, the breaker block is an ICT concept that describes the block that creates a new higher high immediately before it creates a new lower in a bullish scenario. In a bearish scenario, it’s the block that creates a new lower low before immediately creating a new higher high.
The main difference between the mitigation block and the breaker block is that the mitigation block does not first break structure in the direction of the current trend before immediately creating a market structure shift in the opposite direction. Instead, the mitigation block fails to create a new break of structure before yielding to a market structure shift in the opposite direction.
The advantage of the breaker block over the mitigation block is that by creating a break in structure before yielding to a market structure shift, the breaker sweeps liquidity for a potentially stronger reversal.
We have a separate piece on breaker blocks where we describe everything you need to know about it and how to trade it.
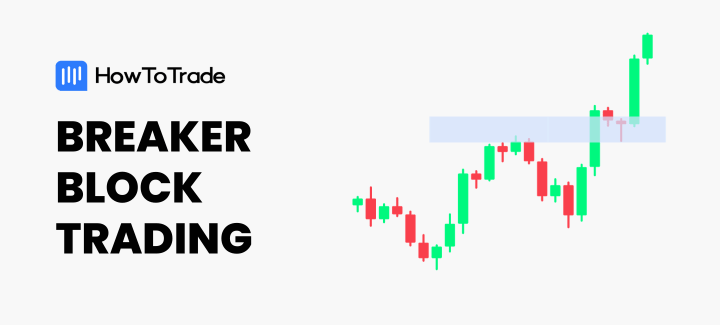
Breaker Block Trading – What Is It and How to Use It?
What are the Limitations of the Mitigation Block?
Mitigation blocks, while valuable, have their limitations. For instance, they work best in trending markets and are less reliable in a ranging or consolidating price movement. Also, they can produce false signals that can cost you your precious capital.
Do you remember we mentioned how that there are two main methods of drawing the mitigation block? Well, there can be more, depending on the scenario. For instance, do you add the wicks to the boundary of the block? Do you use just the upper wick or lower wick? Questions like these lead to subjectivity in marking out the order block.
Another potential limitation is that large market participants can intentionally create false mitigation blocks. That’s why relying solely on mitigation blocks without considering other factors can lead to suboptimal trading decisions.
Finally, mitigation blocks are based on past price action and might lag behind market movements.
Tips on Marking out High Probability ICT Mitigation Blocks?
Not all mitigation blocks are likely to hold and reverse the price. If you’ve been on the chart long enough, you’ll find that many are just traps in waiting.
So, these are tips on marking out and identifying high-probability mitigation blocks:
1. Coincidence with an FVG
If your block coincides with FVGs, they tend to be stronger. For instance, if your bearish mitigation block coincides with a bearish FVG, you have more confluence that once the price reaches this level, it will more likely reverse back to the downside.
2. Presence of Displacement
Displacement is also another vital confluence that adds strength to your Mitigation block. If the move that breaks the structure during the creation of your mitigation block happens with a strong displacement, this is usually a sign that the market is showing strength in the direction of the mitigation block.
3. Market Structure Shift
Not all mitigation blocks cause a market structure shift. However, those that cause market structure shifts are more likely to hold the price as a demand or supply zone in the future. This is because the market structure shift ushers in the birth of a new trend, which corroborates the sentiment of the mitigation block.
Risk Disclosure: The information provided in this article is not intended to give financial advice, recommend investments, guarantee profits, or shield you from losses. Our content is only for informational purposes and to help you understand the risks and complexity of these markets by providing objective analysis. Before trading, carefully consider your experience, financial goals, and risk tolerance. Trading involves significant potential for financial loss and isn't suitable for everyone.