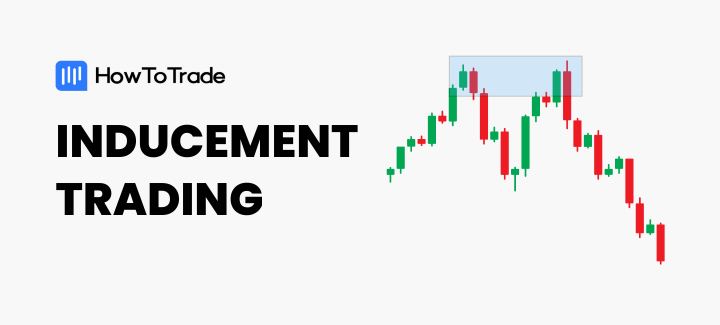
Have you ever tried to get into a trade, but the price instead takes out your stop loss before later going in the direction you forecasted? If that has happened to you, then you have likely been a victim of inducement in trading.
In this piece, we’ll unravel the mystery of the smart money concept inducement in trading. You’ll learn:
- What inducement is and how it works
- The various types of inducement in trading and how to identify them
- How to trade inducements
 Table of Contents
- What is Inducement in Trading?
- How Does Inducement Work?
- What are the Various Types of Inducement?
- How Do You Identify Inducement in a Chart?
- Inducement Trading Strategy (With Examples)
- The Free Inducement Trading Strategy PDF
- What are the Limitations of Inducement Trading?
- What’s the Difference Between Inducement and Liquidity in SMC Trading?
- Additional Tips on Inducement Trading
Let’s get started.
What is Inducement in Trading?
Inducement in trading refers to a situation where large market participants (like institutional investors or “smart money”) manipulate the market to create a false perception of the market’s direction. The goal is to induce retail traders or less informed participants to take positions that are contrary to the true intentions of these large participants.
ICT traders refer to inducement levels as areas where retail stop losses are hunted. Retail traders place their trades in these areas because they believe it’s the right time and place, only for the price to go against them and take out their stop losses before finally going in the direction they initially predicted. That’s why they are called inducement levels. They induce traders into making wrong trading decisions that looked right.
Because the forex market is the most volatile financial market, it’s where you’ll most often find this concept playing out.
How Does Inducement Work?
You need to understand market structure to get a better grasp of how inducement works.
In an uptrend, the market forms higher highs and higher lows. So, when a previous high is taken out to form a new high, we expect to see a retracement and the formation of a new low. We then expect a reversal from that low to break that new high. In a downtrend, the market forms lower highs and lower lows. When a previous low is taken out, we expect the price to retrace to a new lower high before reversing to break the new low and continue the trend.
Simple enough.
But the market just doesn’t move in straight lines. Inside a move from a low to a high, many things happen. You’ll see them more clearly when you zoom into a smaller timeframe. For instance, you’ll find many potential reversal areas to which the price may retrace before finally continuing the bullish market structure.
Of these many levels, only one is the true reversal point. The rest are inducement areas. These inducement levels trick you into entering positions so that the market can take out your stop losses before continuing the major trend.
And that’s how inducement works. It tricks you into positions at levels where your stop losses are likely to be taken out.
What are the Various Types of Inducement?
There are various types of inducements, depending on how they form on the chart.
1. Supply and Demand Zone Inducement
This kind of inducement is common among supply and demand zone traders. It refers to when the price reverses to a key supply or demand zone. But instead of reversing, the price breaks through the zone, taking out the stop losses of traders who entered positions on the zone. And as soon as this happens, the price reverses to continue its move.
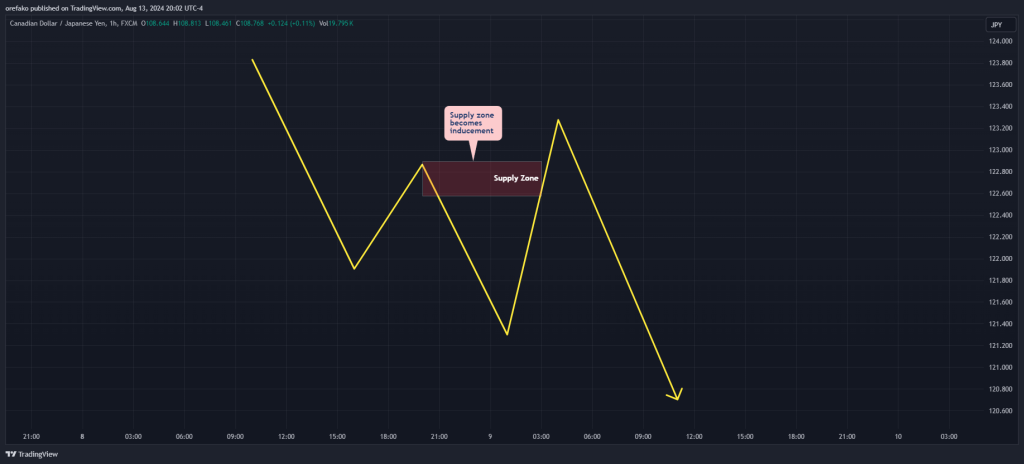
In a bullish trend, for instance, the expectation is that once the price retraces to a previous demand zone, the market will reverse and continue its bullish run. In a bearish trend, you would expect the price to retrace to a previous supply zone before reversing to continue its downtrend. Your stop loss, ideally, would be above the supply zone and below the demand zone.
But instead of this playing out, the price gets to your zone, tears through it to take out your stop loss, and then reverses in the direction you initially predicted.
2. Support and Resistance Inducement
Support and resistance levels are also notorious for being inducement areas. When the price approaches support, you expect it to reverse to the upside. When the price approaches resistance, you expect it to reverse to the downside.
However, instead of these playing out, these areas become areas of inducement, such that they get cleared before the price reverses in the opposite direction. Most traders call them false breakouts.
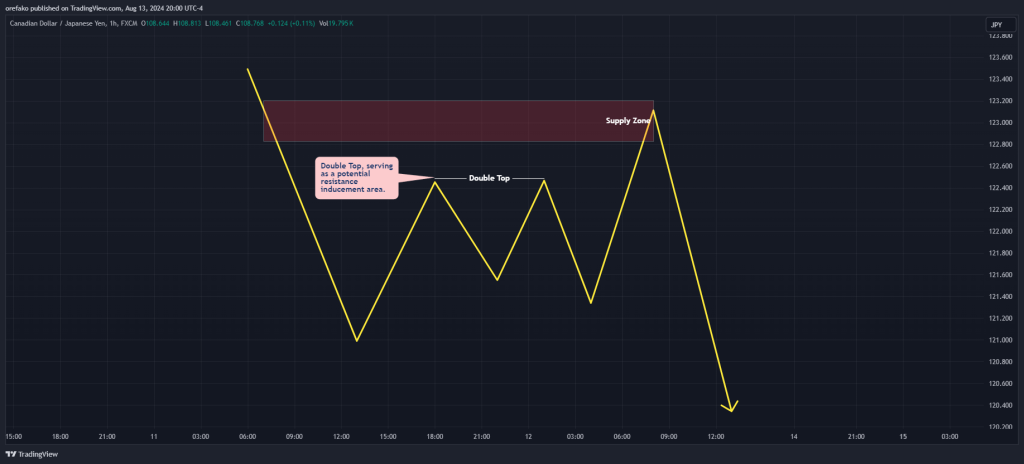
The double-top or double-bottom inducement also falls within this category, as they form clear resistance and support levels, respectively. Trend lines also belong to this category, as they may end up being engineered manipulations by smart money traders.
3. Premature Reversal Inducement
Premature reversals are those that happen without any obvious reasons. For instance, if the price reverses before reaching an order block or a Fair Value Gap (FVG), this is likely a premature reversal. This level could become an inducement for order blocks or fair value gaps on the other side.
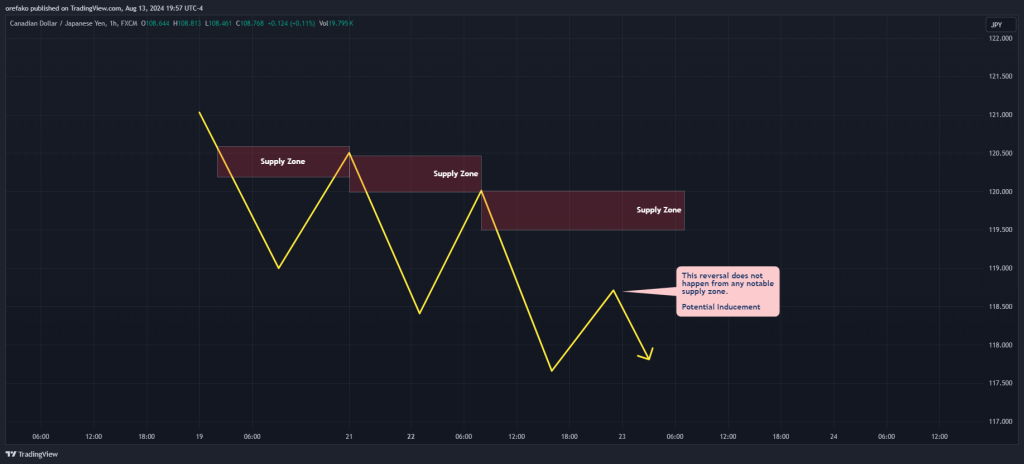
Also, note that sometimes, order block traders may consider all reversals that take place at any level other than an order block as premature. This approach would mean that reversals at fair value gaps are premature. However, how you approach it will depend on your trading style.
4. Consolidation / False Breakout Inducement
This is another kind of inducement that appears during consolidation when the price ranges between resistance and support. Typically, the retail trader would trade this by buying at support and selling at resistance. Another way to trade these ranges is to trade the breakout.
However, these support and resistance levels can be inducement areas. That’s why you’ll see the price break out and clear liquidity on one side of the range and then reverse to break out and clear liquidity on the other side of the range.
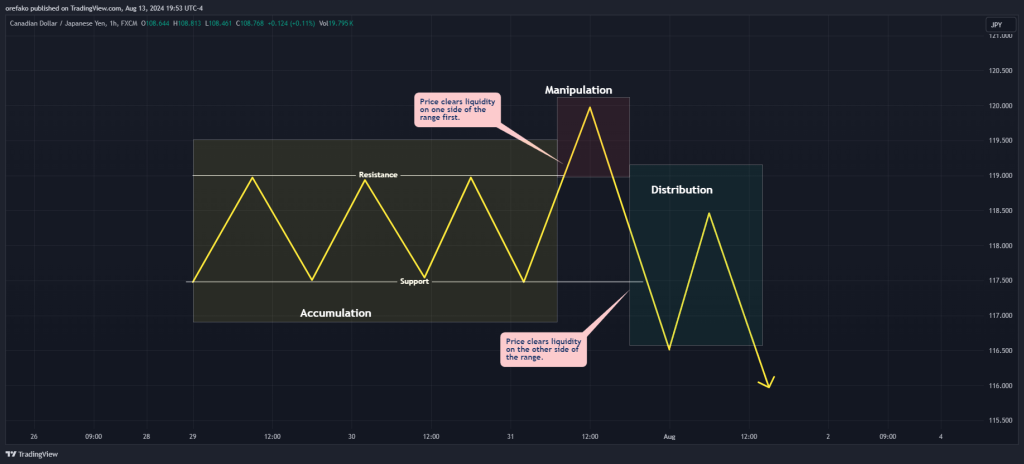
Some call this an external-to-external inducement. Some may even refer to it as false breakouts. Others refer to it as the Power of 3 (Accumulation, Manipulation, and Distribution). Regardless of what you call it, they’re all inducement types.
How Do You Identify Inducement in a Chart?
It is easiest to spot a valid inducement in retrospect. Any notable point of interest that failed was likely an area of inducement. However, spotting them in a live market can be quite tricky. Sometimes, you just don’t know until price action has finished the inducement play. But by then, it’s likely too late, and your stop loss has been taken out.
Does that mean trying to spot inducements is a hopeless case? Not entirely. Here are some ways to potentially identify inducements in trading.
1. Observe the Order Flow
On a higher timeframe, observe the order flow. Is it bearish or bullish? If it’s bearish, then chances are that any bullish move on a smaller timeframe could be an inducement. And if the order flow is bullish, chances are that any bearish move on the lower timeframe is an inducement.
2. Spot Liquidity
Inducement levels coincide with areas of liquidity where many traders have placed orders. So, if you can spot liquidity pools, you can spot inducement.
If the level you’re hoping to trade from coincides with an area of liquidity, your level could be an inducement. Usually, the price takes out this area of liquidity, including your inducement level, and trades into a deeper supply or demand zone before reversing direction.
That is why if your demand or supply zone does not have some form of liquidity before it, then it might be an inducement.
3. The First Pullback Rule.
The first pullback rule refers to the first pullback after a break of structure or a breakout from a support or resistance level. This level is a potential supply or demand zone where the price may retrace to before continuing its new trend. But in many cases, this zone is likely to be an inducement for another zone.
4. Premature Reversal
If you find the market making a turn at a level that has no significant backing, such as an order block or a breaker block, chances are that supply and demand zones on that reversal leg are inducement levels. This is based on the idea that the market doesn’t just move without a reason. The price only reverses when it reaches an area of significant supply or demand. So, if you find the market reversing at areas without clear reversal zones, this could be the handiwork of smart money manipulators engineering inducement.
5. Extreme Volatility Zones
Supply and demand zones formed during an extremely volatile price movement are likely to be inducements. This is because the price has moved with so much volatility that the market is no longer efficient. Approach these zones with caution.
6. Premium and Discount Zones
Usually, the price makes deep retracements before it continues a trend. Knowing how deeply the price will retrace before continuing its trend can help you spot areas of inducement.
When you measure the move from a swing low to a swing high in a bullish trend, the upper half of the measured leg is the premium zone, and the lower half is the discount zone. Similarly, when you measure from a swing high to a swing low in a bearish trend, the lower half is the premium zone, while the upper half is the discount zone.
Areas in the premium zones are likely inducement levels since the price usually makes deep retracements before reversing into its initial direction. So when you find zones or tradeable levels in the premium half, be wary of such zones, as they could be inducement levels.
7. Understand Fundamentals
Sometimes, traders get too sucked into technical analysis that they don’t remember that the fundamentals move the price in the long run. So, a good understanding of trading fundamentals can help you detect which levels are only inducements and which are valid.
For instance, if you have a reason based on fundamental analysis that the price is going to retrace or maybe reverse the trend, you would see any zone that stands in the way as a potential inducement.
8. Experience and Journaling
Ultimately, this is the surest way of spotting inducement. The reason for this is that your strategy is different from mine. Even if we trade the same strategy, chances are that some little details will differentiate your setups from mine.
These “little details” may prove to be significant and weigh on your trading decision. As far as inducement is concerned, only you can tell the levels where you’ve been wrong on multiple occasions in the past from experience and proper journaling. These levels are your inducement levels.
Inducement Trading Strategy (With Examples)
The way to trade inducement is to avoid it (Get it?😀). You know… because you have to spot it and then avoid trades in that area…
Bad joke? Forgive me.
Anyway, we’ll show you how to spot and include inducement into your trading decision with real market examples from a CADJPY chart in the one-hour timeframe. As you’ll soon see, this example has many of the inducement types we mentioned above.
We’ll break the move into various phases so that you can see how things play out.
Phase 1: Supply and Demand Inducement
We see two supply zones in the form of order blocks. They have Fair Vair Gaps right after them, which is usually a sign that a supply zone has some strength. Plus, we’re in a strong downtrend, so everything is looking good.
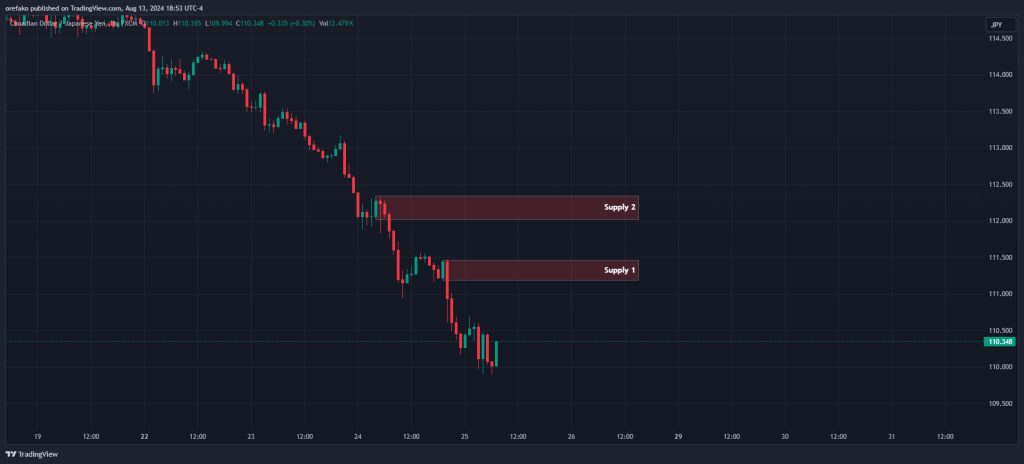
However, only time and price will tell which of these levels is an area of inducement for the deeper order block above. We’ll call the lower order block “Supply 1” and the deeper order block “Supply 2”.
But because we don’t see any type of inducement before Supply 1, we won’t make a trading decision yet. As the saying goes, “no inducement, no trade.”
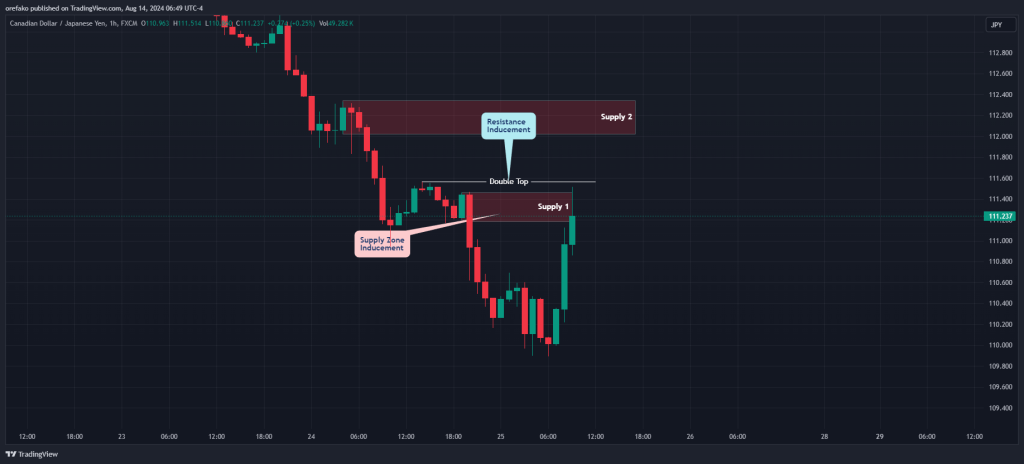
And rightly so, the price returns to this level, forming a double top. Just like that, Supply 1 becomes a likely area of inducement. In addition, we get a Support/Resistance inducement in the form of a double top.
Already, Supply 1 looks less attractive. Supply 2 looks more attractive, as it now has an inducement just below it.
Let’s see what happens next.
Phase 2: Consolidation Inducement
After our supply inducement, we soon see consolidation forming, which is a kind of inducement.
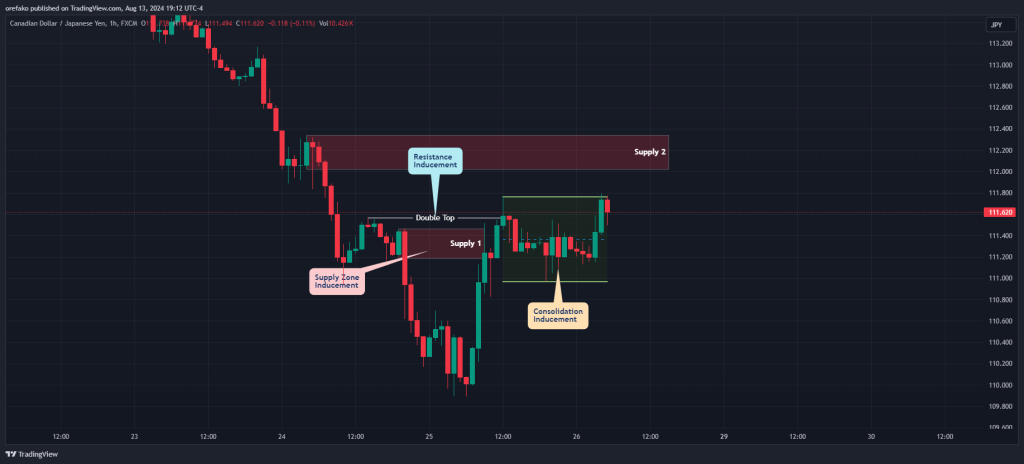
Don’t forget that when a consolidation forms, we expect both sides to get taken out. And that is exactly what happens next.
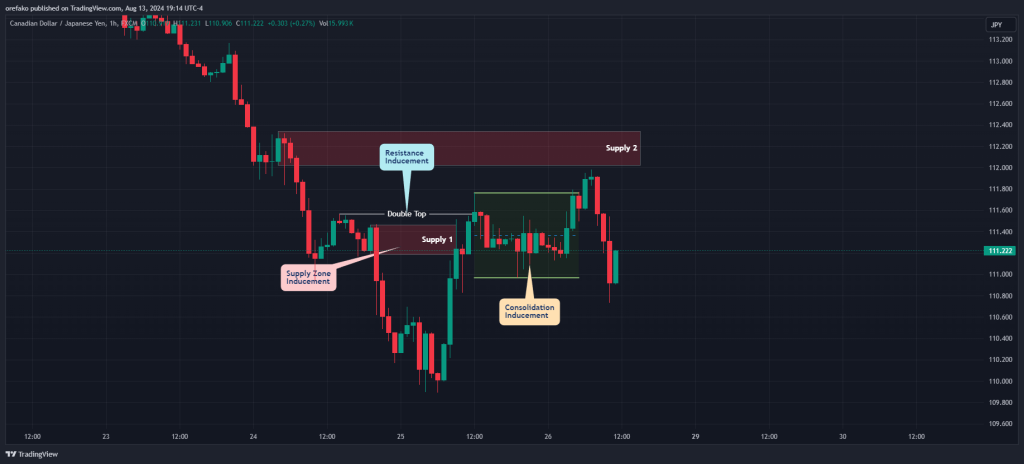
After the range gets taken out on both sides, we get a change of character, a fair value gap, and a new order block. Most retail traders will mark this new level out as a new supply zone, hoping to sell from there.
But notice something. This new supply zone does not mitigate our Supply 2. It reverses prematurely, which makes it a potential inducement level.
Phase 3: Potential Trade Entry
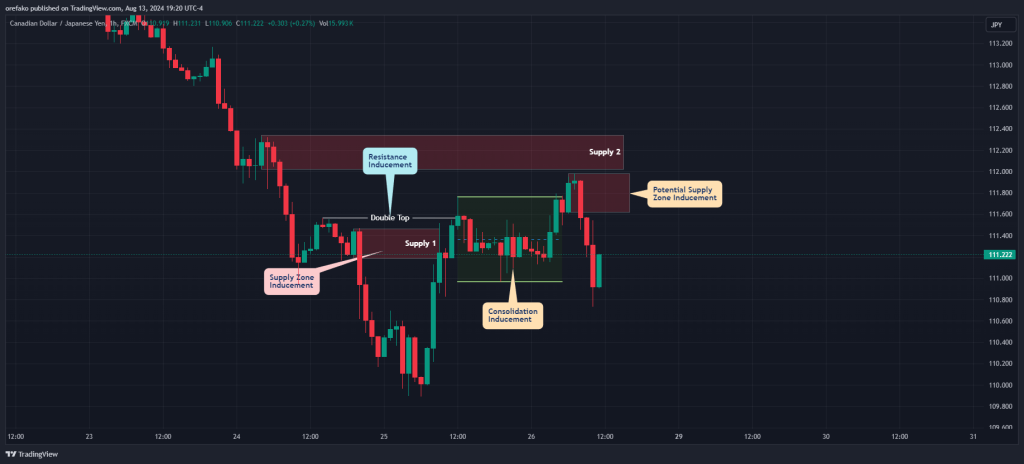
When we play things out, we see another consolidation inducement playing out. Already, we know that one side gets taken out first, then the other.
If, for this reason, you placed your sell order at the new supply zone, you would be forgiven. Why? Because the consolidation serves as an inducement for the zone. However, don’t forget that that zone itself is a potential inducement level. So, you would have to approach it with caution.
To trade tricky situations like this, it’s best to wait for a confirmation after the mitigation of the supply zone before entering a trade. The confirmation will be in the form of a change of character that takes out the other side of the range, then placing your sell limit order on any supply zone that forms during the move. That scenario would look something like this.
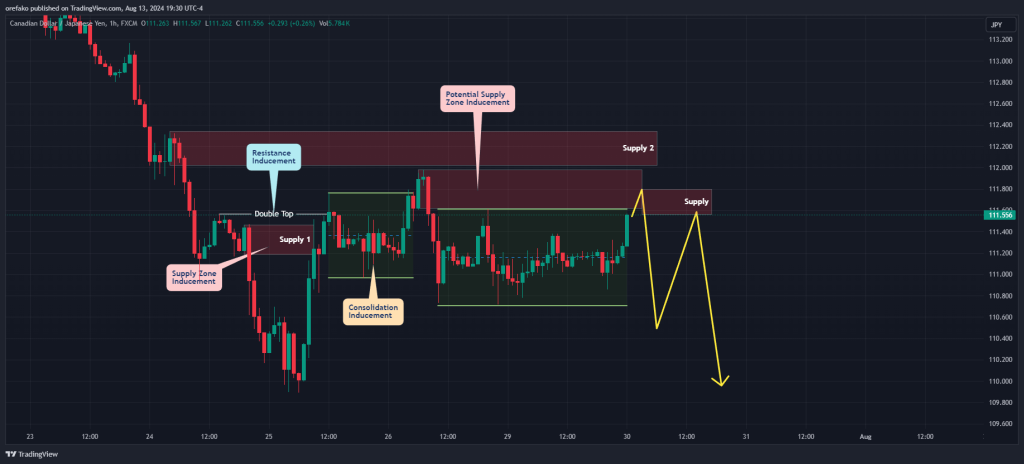
Remember that this is only a hypothetical situation. Before we make any trading decisions, let’s see how the price reacts at this level.
Phase 4: Trade Entry
Our hypothetical scenario does not play out, proving that the supply zone was only an inducement for Supply 2 above. And now that we’ve had all sorts of inducement play out, we look around to see if there’s another kind of inducement lurking around that might cause our trades to fail. We find nothing. And this gives us confidence that Supply 2 is likely to be our reversal point.
Immediately, we place a sell order at that level, our stop loss above the supply zone, and our profit target at the next swing low. Let’s see how the trade plays out:
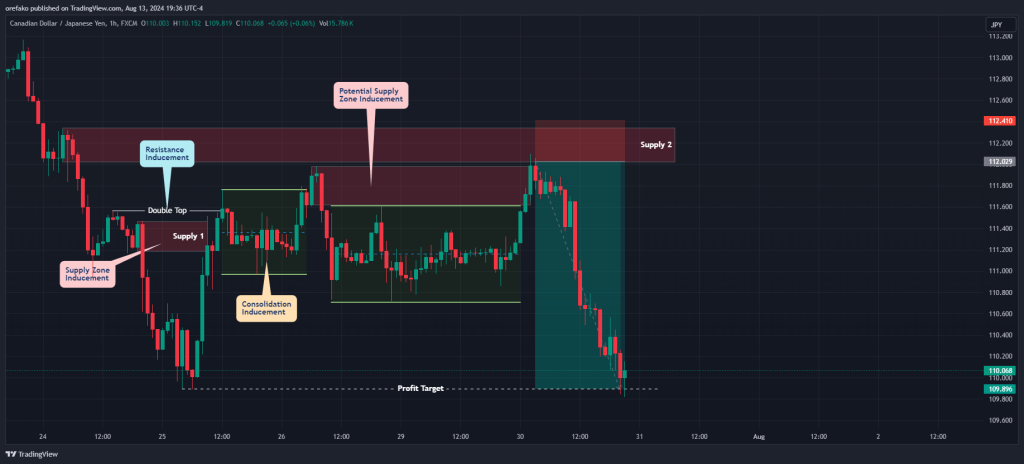
And that is how to spot and factor inducement in your trading.
The Free Inducement Trading Strategy PDF
If you need something you can easily refer to, you can download our free inducement trading strategy PDF here:
The Free Inducement Trading Strategy PDF
What are the Limitations of Inducement Trading?
Inducement trading has its limitations. Perhaps the most significant limitation is that it’s an advanced technique for advanced traders. Novice traders will have a hard time spotting areas of inducement beforehand, and most professionals can only spot them because they were once victims of inducement trading themselves.
Another limitation of inducement trading is that it’s a psychological idea based on the premise that there are market manipulators waiting to hunt the stop losses of retail traders. There’s no real proof anywhere that confirms this. There’s also no way to place trade entries based on inducement alone because the way to trade it is simply to spot it and avoid it.
One more limitation is that any level can be an inducement, even the levels that look least like it. As a matter of fact, inducements are best spotted in retrospect. So, in a live market scenario, you can try to spot areas of inducement, but you can’t know for sure until the move plays out.
Finally, the ghost chase for inducement may cause you to miss out on strong trading opportunities.
What’s the Difference Between Inducement and Liquidity in SMC Trading?
Two smart money concepts that confuse traders are liquidity and inducement. While they often follow each other, there’s a difference between them.
Liquidity refers to areas where there are clusters of stop orders. Once these stop orders are taken out, the market will usually reverse to continue in its original direction. Inducement refers to the traps the smart money manipulators set to cause you to make trades and add your stop losses to the pile of liquidity waiting to be taken out.
Let’s say the market is in a downtrend, and you see a supply zone waiting to be retraced. Your impulse would be to sell at that supply zone. And this makes sense, right? The price retraces into the supply zone, reverses, and then continues its journey downwards. That’s exactly what most retail traders are likely to do. They’ll place their trade entry points at the supply. And where do they place their stop losses? Just above the supply.
This is where liquidity and inducement come into play. The cluster of stop-loss orders resting above the supply is what we call liquidity. Why? Because the price is likely to get to the support, go past it slightly to take out those stop losses, and then reverse to continue its downtrend move. If this does happen, then that supply zone is the inducement or trap that got you to pile your stop loss with the rest of the liquidity.
Additional Tips on Inducement Trading
Before we go, we’ll share some tips on inducement trading that you should know. These tips may seem simple and obvious, but you’ll soon see that not adhering to them is one of the most common mistakes newbie traders make.
1. The role of multiple timeframes
Understanding the role of multiple timeframes can help you better understand where and when to enter the market. Also, inducement often unfolds over extended periods. So, try to avoid impulsive decisions based on short-term price fluctuations. Keep the higher timeframe perspective in mind.
2. Use proper risk management
Carefully calculate position size based on risk tolerance and account balance to manage potential losses. You’ll be wrong in the market many times. You’ll be induced into taking trades prematurely or too late. It happens. So, managing your risk in such a way that you won’t burn your capital beyond recovery is important.
3. Remain disciplined
Don’t let emotions get the better of you. If your setup is yet to form, don’t force it. And once your setup forms, execute without hesitation. Don’t let greed and fear force you into trades. Even when you get induced into trades that eventually take out your stop losses, remember that it happens. Learn from it and move on. And that’s why you must create a well-defined trading plan outlining entry, exit, and risk management rules. This is the only way to maintain trading consistency.
4. Don’t stop learning
Keep abreast of market dynamics, economic indicators, and evolving trading strategies to adapt your approach. Consistent analysis and backtesting can refine your ability to identify inducement patterns and improve your decision-making.
Risk Disclosure: The information provided in this article is not intended to give financial advice, recommend investments, guarantee profits, or shield you from losses. Our content is only for informational purposes and to help you understand the risks and complexity of these markets by providing objective analysis. Before trading, carefully consider your experience, financial goals, and risk tolerance. Trading involves significant potential for financial loss and isn't suitable for everyone.


